
1st Friday Fun Session – 6th Jan 2017
IMAP and POP3 are the two most prevalent standard protocols for email retrieval that work over a TCP/IP connection. However, Gmail also introduced Gmail API that gives RESTful access to user’s mailbox under OAuth 2.0 authorization. To get a feel of this, we will write a small desktop application that uses Gmail API to connect to a specific mailbox and performs some operations.
Application description
Our small C# console application connects to a specific mailbox, retrieves items filtered by a time period and puts back the same in the same folder (Inbox, Sent etc.), from where it was originally read, in an encrypted form.
We will connect the mailbox using RESTful access through Gmail API. That also means, authorization would be done using OAuth 2.0 protocol.
Input to the application
Input to the application would be: mailbox name, mailbox password, start of the retrieval period, end of the retrieval period, a password, and a salt – the last two are used for generating symmetric keys for encryption.
The input is read from a file named input.txt, placed in the application path.
Each of the five input fields is a key-value pair, separated by a single space, occupying a single line. Sample input.txt file content is shown below:
- mailbox some.email.id@gmail.com
- start_time 2016/12/14
- end_time 2016/12/15
- input_key BA994A37-901D-4777-8054-6C5D87500AB7
- salt 65DA56D0-9285-41A0-975E-323420D0602B
The key mailbox denotes gmail id. Both dates use yyyy/M/d format, end_time being no earlier than start_time. Time could be included/used. Salt must be at least 8 bytes long.
The steps
We need to do the following steps:
- Authentication/Authorization
- Getting emails from Gmail
- Encryption
- Insert emails back
Authentication/Authorization
Google APIs (Gmail is one of them) use OAuth 2.0 protocol for authentication and authorization. All applications have to follow a basic pattern for accessing a Google API using OAuth 2.0.
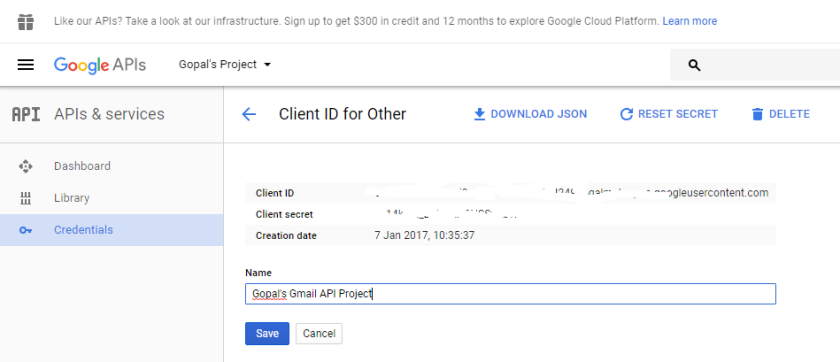
Get credentials
At first, we must create a Google API Console project. Once created, we get credentials for it. Credentials are essentially composed of the following two values that are known to both Google and the application.
- Client ID
- Client Secret
Google console pages look like below:

Get access token
The second step is to get an access token from Google Authorization Server. During access token request, a scope parameter is also sent. Scope indicates all the accesses requested for.
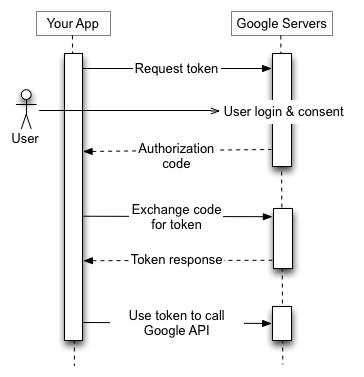
Depending on the kind of applications (web server, installed, client side) the authorization sequences might vary slightly. Since ours is an installed application, we would get authorization code first. We then exchange this code for a token. Below image that is taken from Google, depicts the process.
Get authorization code
To get authorization code from Google, we first open an HttpListener on local loopback address, with a dynamically found available port. However, this requires elevated privilege. Hence, the application needs to run at elevated privilege. This could be avoided by doing URL reservation. However, that itself requires elevation.
We then open an authorization request in browser from the application. Authorization request would require:
- Authorization endpoint: https://accounts.google.com/o/oauth2/v2/auth
- Scope: https://www.googleapis.com/auth/gmail.modify
- Redirect URI: local loopback address, as explained earlier
- Client Id: Client Id credential, as retrieved for the Google API Console project
- State etc.: some additional information like state etc. to verify that response from server is due to a request made by this application. Verification happens once the response from Google server is back.
User’s consent screen looks like below.
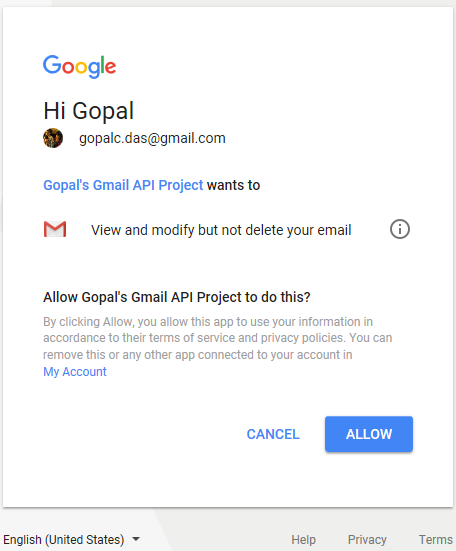
Scope can vary. Modify as scope, as shown here is sufficient to call all the three APIs (get, list and insert) that we need for our application. However, instead of asking for all the authorization upfront, scope should be increased incrementally.
If all is well, we will get an authorization code. However, to make any API call, we need access token. So now we have to exchange this code for a token.
We make an HttpWebRequest POST using
- Token endpoint: https://www.googleapis.com/oauth2/v4/token
- Code: as found earlier
- Client ID: credential as explained earlier
- Client secret: credential as explained earlier
All Gmail API endpoints are https, meaning all API calls have to be made using encrypted SSL/TLS channel. In .NET, we can easily use HttpWebRequest class. However, in other languages, if such a library is not available, we might use GnuTLS, OpenSSL etc. to create a TLS/SSL channel to enable us making https calls.
Make API call using access token
Now we can make Gmail API call, using the token in an authorization header.
Refresh Access Token
Access token has limited lifetime. We might require refreshing the access token, if necessary.
Getting emails from Gmail
To read emails, we will use list and get APIs, using the access token that we already received.
list
For list API call, we are making an HttpWebRequest GET request with endpoint: https://www.googleapis.com/gmail/v1/users/userId/messages.
Parameter userId is the gmail id. Optional query parameter q can be used, to specify after and before date to filter data. It should be mentioned that there is a max limit (I found it to be 500) as to how many emails (essentially, emaid id and thread id combination) we can read. We are content with as many results as found in the first call. No attempt is made to make further calls to read more emails.
get
For each listed email found in the above call we are now calling the get API using GET https://www.googleapis.com/gmail/v1/users/userId/messages/id.
Parameter userId is gmail id and id is the email id that is found from the previous call. Optional query parameter, format is used with value set to full. For each email, we are retrieving the subject and labels. If the input has a time component, then at this stage, we can further filter based on it, using internalDate property of the Users.Message resource.
Encryption
Encrypt with Rijndael
For encryption, Rijndael is used. Password and salt are taken as input. A 256 bit AES key is generated. We are using RijndaelManaged with default 128 bit block size; hence, it is AES compatible. Since this is symmetric key, the same key is used for both encryption and decryption. And the same key is used for all the emails.
get with format raw
For each email, we are making another call to get API, this time with format set to raw. Here we are duplicating the read API call. However, this way, we can directly get the raw property of Message resource, necessary to make insert API call. We don’t need to construct the raw property on our own.
At first, we are decoding the raw as found above. Then we are searching for the subject (that, we collected earlier, using get API with format full) in that. Starting from first character of the subject, we are encrypting the rest of raw. That will encrypt subject and body parts, along with some more data.
Regarding encryption, we could do that for the whole of raw or only for parts like subject, body and so on. As mentioned above, for simplicity, we have encrypted everything starting from subject. We have also written functions and tested that we can correctly decrypt the encrypted data.
While inserting the email into gmail folder, it would have been better if we could somehow indicate that the email is encrypted. That way, we could stop encrypting an email more than once, or identify that a certain email is in encrypted form.
So, in short, data in field raw of the Message resource is decoded, converted to a string and then encryption is applied on the plain text. It is then reverted back to base64url encoded form for insert.
Insert emails back
insert
The encoded raw along with labelIds collected earlier is now used to make an insert API call using POST https://www.googleapis.com/gmail/v1/users/userId/messages.
Once again, userId is the gmail id. Only raw and labelIds are used (in the request body), the latter (labelIds) is to make sure that the inserted email ends up in the same folder. Thread Id parameter could be used easily, however, chose not to include.
We have not used the upload URI. This is because we have only dealt with metadata and not (email) attachments, once again for simplicity.
Output
When the application runs, it asks user to press a key. Once the key is pressed, it starts working in asynchronous mode. Pressing a key further would stop it.
The application first opens Google server in browser for user to authenticate/authorize. Once that is done, it prints out how many emails it is going to read/encrypt/insert, based on the input parameters. It might take a while before it starts printing a line for each of the inserted emails.
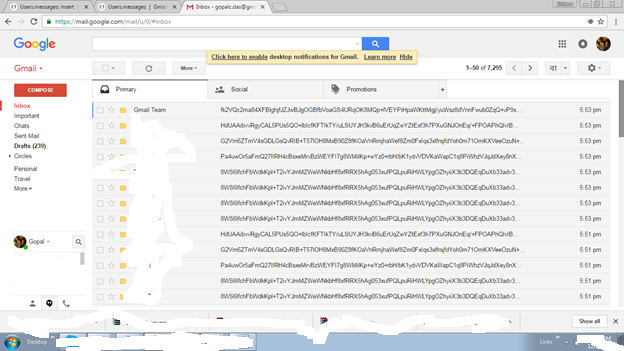
This is how it looks in the Gmail folder.
GMail API client libraries could be good starting point for writing such an application.
GitHub: GMail API
